![[SoundStage!]](../sslogo3.gif) Synergizing with Greg Weaver Synergizing with Greg WeaverBack Issue Article |
| March 1998 Biwire or Biamp, Bi Golly! Many of you have probably heard the terms biwire or biamplify, but may not realize what they mean or understand the significance of their application. The use of either spells clearer, purer, and more articulate sound for those of you whose speakers will allow you to employ these sonic upgrades. Unfortunately, not everyone may be able to apply these methods right now. The first thing to check is the back of your speakers. If they have two sets of binding posts, two red input terminals and two black, then you’re ready to try something that the manufacturer of your speakers hoped you would utilize. After all, manufacturers wouldn’t just include a back-up set of speaker inputs, would they? As you may have noticed when you checked for twin sets of binding posts on the back of your speakers, the common-colored posts are "strapped" together by a jumper of some nature. Those jumpers are provided to link the speaker’s internal crossovers, since not everyone wants to be bothered with biwiring or biamping. The crossover is nothing more than a specialized filter, consisting of coils, capacitors, resistors and diodes. Its purpose is to sort and direct the full-frequency audio signal provided by the amplifier. In a two-way speaker, it divides the music into highs and lows, based on the manufacturer’s pre-determined flex point. Frequencies above that point are only allowed to pass on to the tweeter, while everything below that flex point is passed on to mid-woofer. The term biwire simply refers to the fact that you will be running two sets of loudspeaker cables from your amplifier to each of your speakers. To get started, you will first need to acquire a second set of speaker cables. They can be the same as the ones you use now, or different if you don’t have two identical pairs. More on that later. They should be the same length, however.
Head next to the back of your amplifier or receiver. If it is equipped with the traditional five-way binding posts, the next step should pose no significant problem. The idea is to hook both sets of speaker cables to only one set of corresponding terminals on the back of the amp. This means that both of the positive ends for the two right sets of cables are connected to the single plus terminal of the right speaker output and both of the negative ends from the two right sets of cables are connected to the single minus terminal of the right speaker output. Do exactly the same for the left channel with the other two sets of loudspeaker cables and we’re ready for the next step. If your chosen loudspeaker cables use the banana-type connections or if your amplifier or receiver uses the push spring-clip type of connections, try the following. First, see if your receiver or amp has a second pair of speaker outputs. These are usually labeled A and B or something similar. If so, you can insert one set of wires into the A speaker output and one set into the B output. Don’t forget to switch both outputs on from the front of your receiver or amplifier (if necessary) or you will only be powering half of the speaker compliment. If you do not have that A and B output option, then you will have no choice but to use wires that are unterminated. In this case you will have to twist the bare-wire ends of the pairs together and carefully insert them into the push spring-clip terminals. BE VERY CAREFUL not to let any stray wire touch any terminal other than the one into which it should be inserted, or your amp COULD GO UP IN SMOKE! You may choose to pass on trying to biwire if that is the case. If you proceed, you do so at your own risk and assume all liability for any damage that may occur. Once you’re done at the amp end, run both doubled-wire sets to the back of the respective speakers. All that is left to do now is to attach one set of speaker cables to the high-frequency terminals and the other set to the low frequency inputs of each speaker. Now power everything up and enjoy the fruits of your tweak. There should be more clarity and detail to the midrange and high frequencies. Often the bass becomes less fat in nature, becoming both a bit faster and tighter. Focus and staging should improve nicely as well. You may notice less congestion in dynamic or complex passages. In all, this is a very effective and desirable improvement and only requires the investment in a second set of speaker cables. Biwiring works by reducing of the tendency for strong bass signals to overwhelm the rest of the audio signal. The larger, more powerful bass signal can greatly affect the integrity of the much lower-energy components of both the midrange and fragile treble information. Running separate wires from the amplifier can have a profound impact on relieving the tweeter circuit from the back flush of EMF (elector-motive force) generated by the woofer. When the audio signal to the woofer ceases, such as when a loud bass note is finished, the woofer tries to stop moving. In trying to stop, it actually goes through a process of "settling" because it is too massive to just stop instantly. As it settles, it moves forward and backward repeatedly until it can completely come to rest. During this movement, as the voice coil is moving through the field of the magnet, it generates its own signal. That generated signal is sent backward up the woofer wires and into the crossover, where it corrupts the rest of the music signal. Biwiring also affords you another grand luxury. Aside from helping to eliminate distortions, it also permits you to select specific wires for each frequency application. If you have been in this hobby/sport/disease for any length of time, you will have at least heard by now that all wires, both loudspeaker and interconnect, possess their own characteristic sound. When biwiring, you have the ability to match a wire that is open and airy, but is perhaps lean in the bass region, to the tweeter. By the same token, some of the best bass performance is delivered from wires that aren’t so revealing or extended in the high frequencies. So hitch up the low-frequency drivers with that wire. Now you’ve got the best of both worlds!
Whatever pair of amps you select, you must now get the preamplifier output of both left and right channels to both amps. If you are lucky enough to have a preamplifier with two sets of outputs, you’re home free. If not, this is most easily accomplished with the use of what is known as a Y-adapter, which consists of one male RCA jack that is terminated with two female RCA plugs. Y-adapters come in two varieties: one made from cable and the other fashioned from a solid piece of metal. The cable version is made up of short lengths of cable, and the solid-body job is a machined metal splitter. Exercise care when choosing your Ys. The dollar-ninety-niners at Radio Shack or Circuit City are certain to degrade the overall performance of your system more than enough to negate the advantages you hope to gain by biamping. Travel to an audio shop and pick out two good-quality, well-terminated Y-adapters. Inserting one of these Y-adapters into both the left- and right-channel outputs of your preamplifier will give you the necessary two outputs for each channel. Now you will need to use two pair of interconnects, one set to carry the stereo signal for the high-frequency amp, the second pair to do the same for the low-frequency amp. The speaker outputs of the amp chosen for the highs are then connected to the respective high-frequency terminals of both speakers. That is, the left output from this amp feeds the left speaker’s high-frequency input terminals, while the right output from the same amp feeds the right speaker’s high-frequency input terminals. Duplicate these connections from the other amplifier to both speakers’ low-frequency inputs and you are ready to go. Some people choose to use an electronic crossover between their preamplifier and pair of power amps. This active crossover pre-filters the audio signal at a low-voltage level and sends only predetermined bass frequencies to the bass amp and high frequencies to the tweeter amp. While this is desirable for a number of reasons, it is not mandatory to enjoy the benefits of biamplifying. Advantages to biamping are identical to those of the simpler biwire application, with added benefits. Since you have probably doubled the power you were using with just one amp when biwiring, it will provide even more clarity and detail as well as providing more power to the speaker system. This will likely aid in such areas as dynamic contrasts, individual voicing of instruments and deep-bass performance.
In this case, each amplifier will still receive two channels of information from the preamplifier, but they will both be the same. The amplifier dedicated to the left speaker will now receive a pair of left-channel outputs from the preamplifier to feed both its right and left channel. The second amplifier, dedicated exclusively to the right speaker, will then receive a pair of right-channel outputs from the preamp for both its left and right input. This can be achieved in the same manner as used in the standard configuration, but by simply changing how the two patch cables are connected to the Y-adapters at the back of the preamp. You then use each amplifier to run its own speaker rather than having the tweeters driven by one amp and the woofers by another. You would, for example, use the left output of the left amp to drive the left speaker’s highs and the right channel of the left amp to drive the left speaker’s lows. The right side being a mirror image of the left. No, it is not necessary to use the left channel for highs and the right for lows, I simply chose them in order to describe the hook-up. This method has a distinct advantage over the standard configuration. Cross-talk (the tendency for one channel to "bleed through" to the other and thereby cause distortion) in the power amplifiers has effectively been eliminated. Both channels of each amplifier see identical information, so even if there is any kind of spurious leak-through of audio between left and right, because it is the same signal, it cannot create harmonic or inter-modulation distortions. This configuration offers the highest potential for left and right separation available from a biamplified setup. Give it a try. Just adding a second set of speaker cables can uncover tremendous clarity and increase the focus, staging and imaging in even the most modest of systems. If you happen to be fortunate enough to have a second amp lying around, or can afford to add one, go for the biamp method. You will have moved one step closer to musical nirvana. ...Greg Weaver |
|
| All Contents Copyright © 1998 SoundStage! All Rights Reserved |
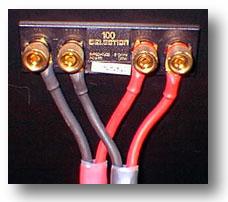 Next, you need to remove the strapping or jumper connection
between the two sets of posts on your speakers. These dual posts are usually located one
above the other, but there are some other less likely configurations (such as for the
Celestions shown). If you are unsure exactly how to do this, consult your speaker manual.
For most speakers, removing the connection will be obvious. One jumper ties both red
terminals together and one unites both black terminals. You simply back off the nuts on
the binding posts and remove the strapping device, usually two flat bars or wires.
Un-strapping the posts allows separate paths to the individual crossover for each driver
or group of drivers. If you own a speaker with three or more drivers but with only two
sets of binding posts, you’re still fine.
Next, you need to remove the strapping or jumper connection
between the two sets of posts on your speakers. These dual posts are usually located one
above the other, but there are some other less likely configurations (such as for the
Celestions shown). If you are unsure exactly how to do this, consult your speaker manual.
For most speakers, removing the connection will be obvious. One jumper ties both red
terminals together and one unites both black terminals. You simply back off the nuts on
the binding posts and remove the strapping device, usually two flat bars or wires.
Un-strapping the posts allows separate paths to the individual crossover for each driver
or group of drivers. If you own a speaker with three or more drivers but with only two
sets of binding posts, you’re still fine.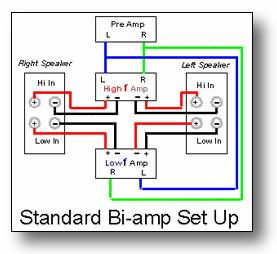 Taking the next step, or biamplifying, affords you even more
advantages while admittedly greatly increasing the overall cost. In the standard
configuration, you use one amp to reproduce the high frequencies and one to reproduce the
low frequencies. Since this requires two amplifiers, it is not as cost-effective as just
biwiring. In this application you may use two identical amps or, again taking treble and
bass performance of separate amplifiers into consideration, you can select an extended and
articulate performer for the highs and a strong bass performer for the lows.
Taking the next step, or biamplifying, affords you even more
advantages while admittedly greatly increasing the overall cost. In the standard
configuration, you use one amp to reproduce the high frequencies and one to reproduce the
low frequencies. Since this requires two amplifiers, it is not as cost-effective as just
biwiring. In this application you may use two identical amps or, again taking treble and
bass performance of separate amplifiers into consideration, you can select an extended and
articulate performer for the highs and a strong bass performer for the lows.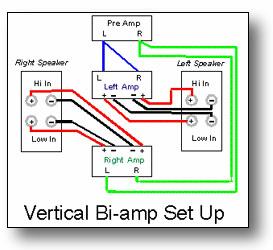 The second method of biamplification is known as the vertical
configuration. This differs from the standard method in how the output of the two power
amps is applied. In the vertical biamp, one amp is used to power only the left speaker and
the second for only the right speaker. For this arrangement, the use of identical
amplifiers is imperative.
The second method of biamplification is known as the vertical
configuration. This differs from the standard method in how the output of the two power
amps is applied. In the vertical biamp, one amp is used to power only the left speaker and
the second for only the right speaker. For this arrangement, the use of identical
amplifiers is imperative.